I had another idea for a musical instrument, and I think it worked out pretty well.
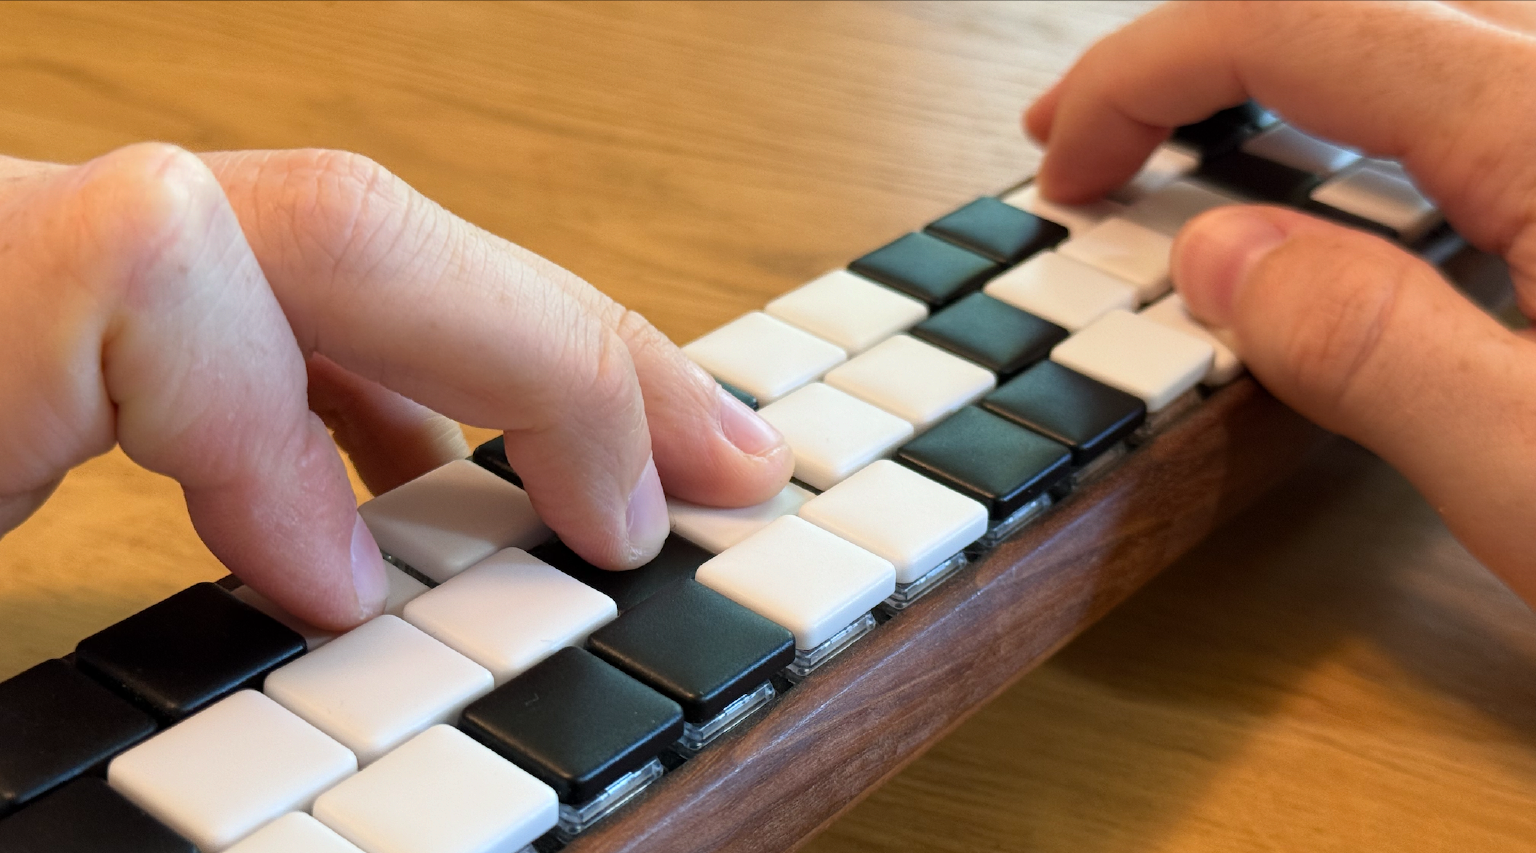
It’s sort of a cross between a chromatic button accordion and a keytar. Or maybe it’s a digital Chapman Stick… except that it’s more polyphonic and tuned completely differently.
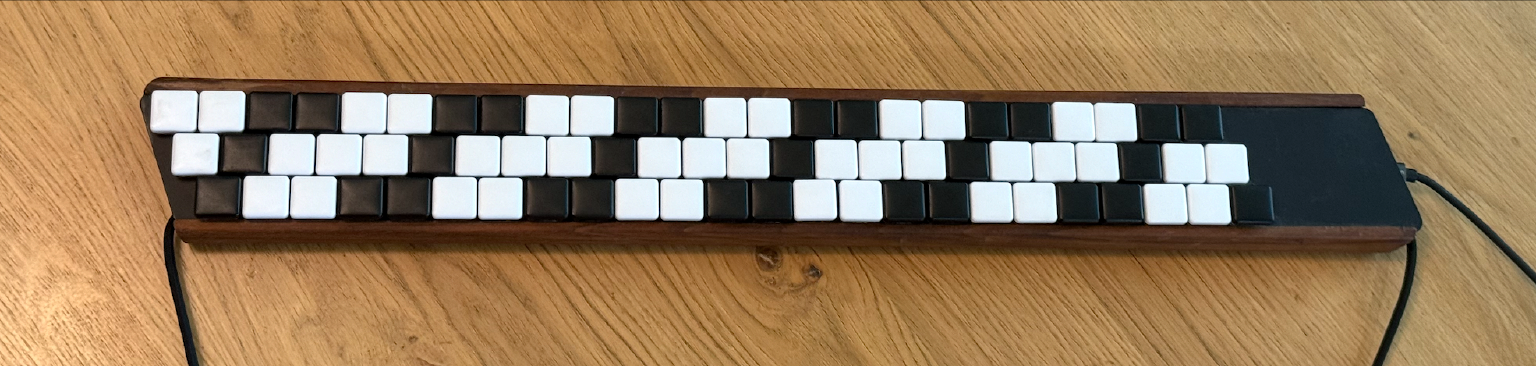
I don’t know. It’s kind of a new thing, I think.
The chromatic button accordion is probably the oldest and certainly the most popular isomorphic keyboard instrument in the world, so it’s not that much of a new thing. But as far as I know, the keyboardion is the first instrument that adapts its tuning to this particular form factor.1
All of the digital isomorphic keyboards that I know about have more of a square aspect ratio,2 and they’re usually designed to be played like a piano or a concertina: both hands symmetrically engaged with the keyboard.
But I was really curious how this asymmetry would feel: the left hand probably plays in the bass register, so it can accompany the melody with chords. The left hand is pretty good at forming chords on a guitar. Maybe it’ll work on this weird keytar thing? Let’s find out.
Okay so what is this
The note layout looks like this:
I’ve highlighted a single full octave. Why did I highlight an octave starting at C♯? I dunno; that’s kind of just where I happened to draw this. You can slide that anywhere left or right; you could transpose this so that C is on the top row without changing the relative layout.
The important thing to note are the intervals: moving down and to the right goes up a semitone. Moving up and to the right goes up a whole tone. Moving directly to the right goes up a minor third.
This matches a “B-system” accordion, which the internet tells me is common in Russia. It also says that most Western chromatic button accordions use the “C-system” layout, which is the same thing but flipped upside down:
No idea if that’s true. I tried both, and found the intervals on the B-system more comfortable for common chord shapes on the left hand. For example, here’s the shape of a major triad in each system:
The left-hand shapes just felt more familiar and more guitar-like, I guess (remember, the left hand is coming from the “top” of this diagram). It’s easier for me to curl the index finger and extend the others than the other way around.
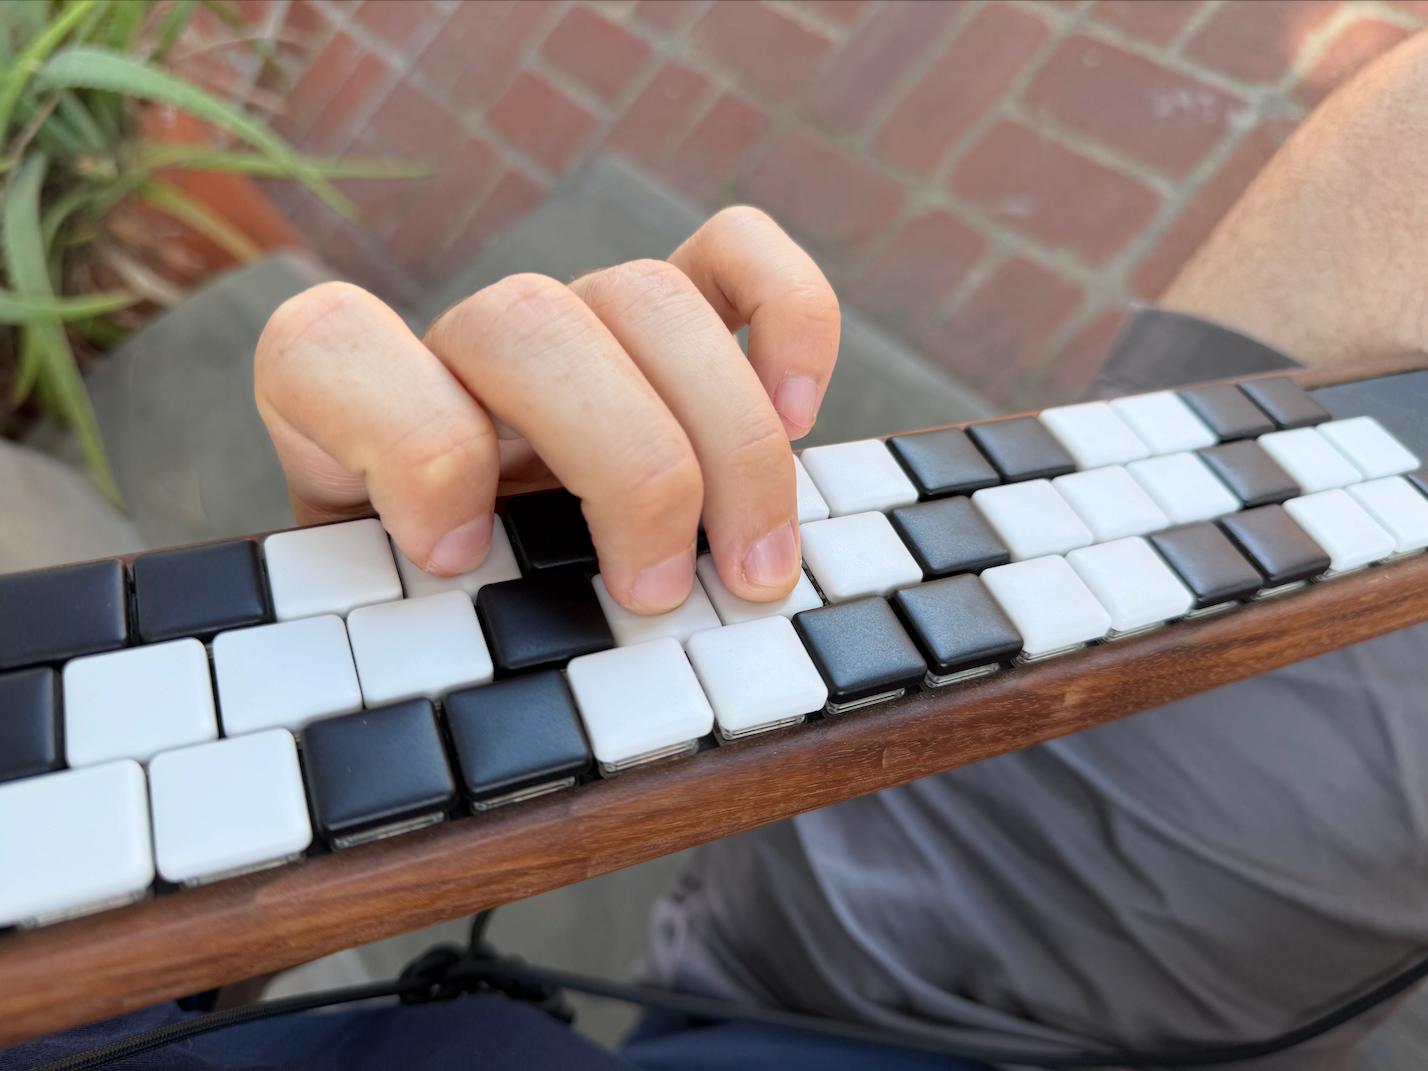
I’m not sure that this is the right decision – especially if you already play a C-system accordion – but that’s an easy thing to tweak.
Anyway.
What I’ve shown here – and built – is a three-row treble keyboard. That’s the minimum number of rows you need in order to span a whole octave, but it’s definitely not the ideal number of rows. As soon as I built this I started pining for a larger keyboard.
Like, I said this was the “shape” of a major triad:
Which is true if your root note is on one of the two upper rows. But what about C major? We can’t “go down a row” to find the third and the fifth, so we actually need to use a different chord shape for the exact same voicing:
And that particular shape is a lot less comfortable for my left hand.
This means that we’re missing one of the core benefits of an isomorphic keyboard layout: we can’t translate all of our chord shapes and intervals around the keyboard to any root note.
But there’s an easy fix: make the keyboard bigger, and continue the pattern of half steps and whole steps.
Notice that these new keys are redundant: the notes on the bottom row are exactly the same as the notes on the top row, just shifted over one.
This works for your basic triads, but we don’t have all possible chord shapes for all notes yet. A maj7 chord spans all three rows of the “base” layout; if we want to use the same shape for every root note, we need to add one final row:
When you’re making an accordion, the redundant buttons are physically linked together – pressing one button will depress the corresponding redundant button, and they activate the same reeds, so adding rows doesn’t add too much complexity to the instrument. Some accordions even have six rows, so that each key has a redundant counterpart. This isn’t necessary to get isomorphic shape coverage, but I can imagine the additional fingering options are useful at the level of professional performance. I don’t know. I don’t play any of these instruments.
In any case, I built the simplest possible version: a three row keyboard. And I am just quietly sad when I have to switch between chord shapes.
Construction
Physically, it’s just a hand-wired mechanical keyboard.
It uses regular keyboard switches, so there’s no velocity sensitivity – you can’t play it softly or loudly. This is a limitation of this prototype, but not a fundamental fact about the instrument. It’s just that I can build a mechanical keyboard in a weekend, but building a velocity sensitive keyboard from scratch is well beyond the limits of my ability.3 (I had originally planned to add a breath sensor, to make a sort of a digital melodica, but I never did.)
The advantage of hand-wiring a keyboard is that you can make a keyboard in any shape you want by manufacturing one simple part called a plate – a thin sheet of metal with holes cut in it. The last time I built a keyboard, I ordered a stainless steel plate from SendCutSend and then spray-painted it. But SendCutSend offers their own in-house finishing, and I decided to try that.
The plate I designed cost $65 in 1.2mm stainless steel, and it was only $18 more to throw a matte black powder coat on it.
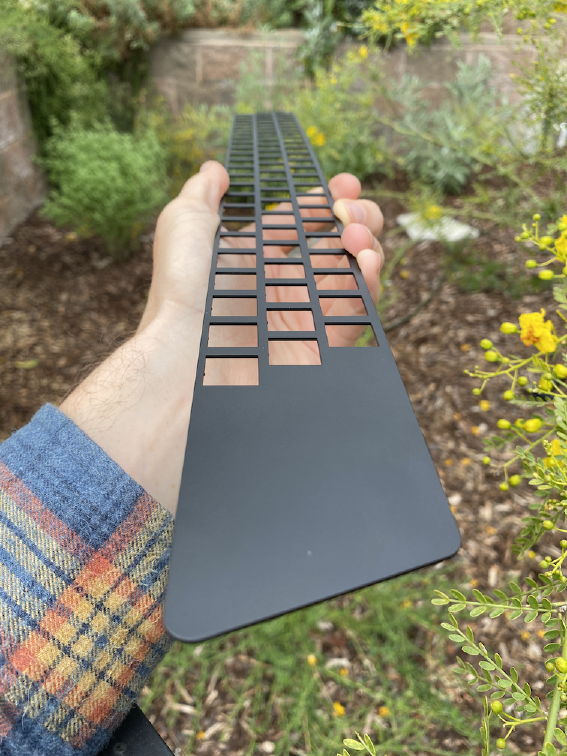
I was really happy with how it turned out, although there was a flaw in the finish: this small speck that you can see in the foreground of the image. I didn’t notice it until I took this photo in full sunlight, and I haven’t noticed it since.
Even after throwing quite a lot of abuse at this thing – hammering it in and out of the wooden case I built – the finish has never chipped or scratched or anything. It’s held up a lot better than the spray-painted plates I made for my Kyria.
After I got the part, I did a dry fit with some switches to ensure that I actually got the measurements right.
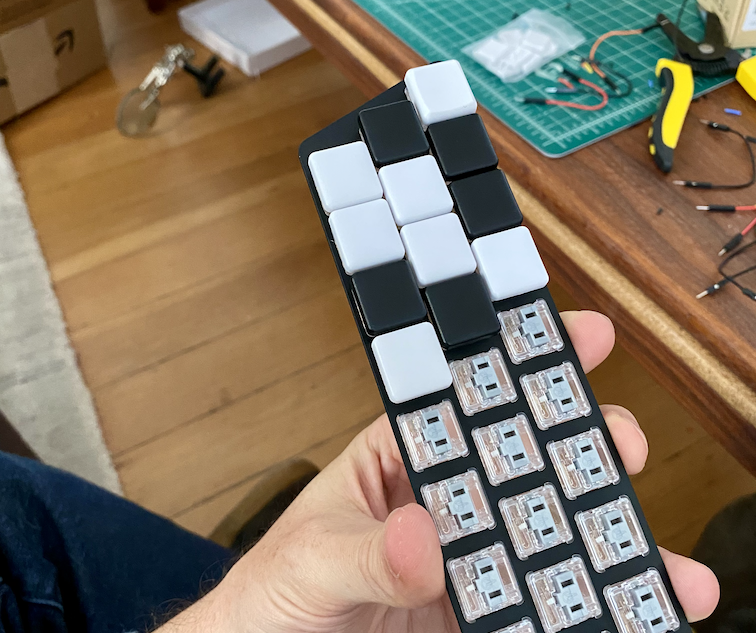
A perfect fit.
Hand-wiring a keyboard
I had never hand-wired a keyboard before, and I will never hand-wire a keyboard again.
It looked so simple. I had read this guide before. I even bought the weird insulation stripper thing that it recommends that was supposed to make the process easy.
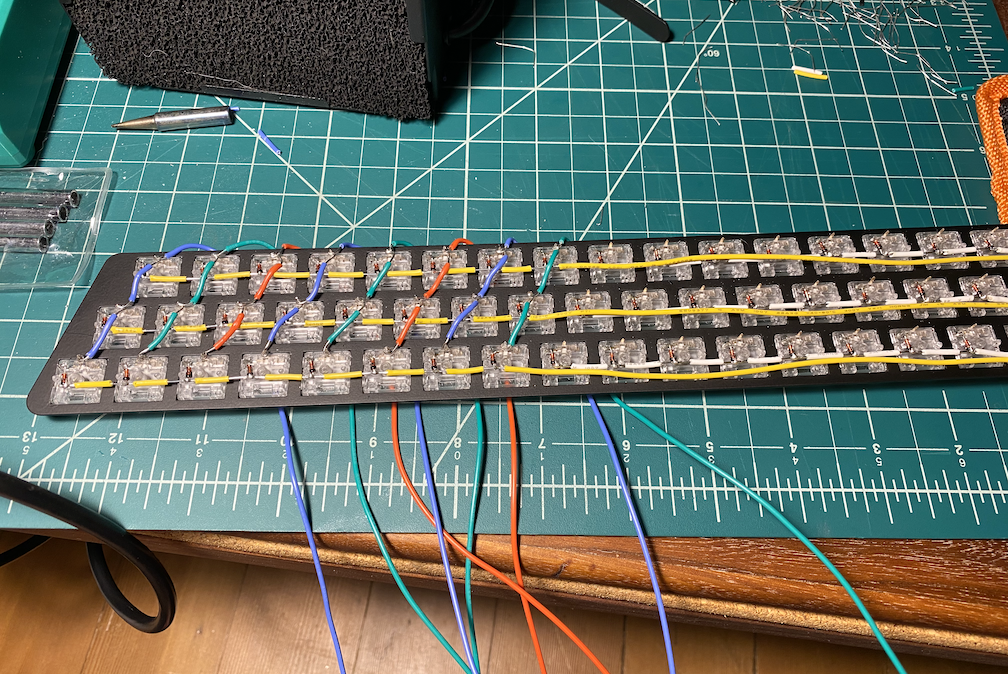
But I spent eight full hours assembling this thing. And it wasn’t, like, eight fun hours. It was eight moderately frustrating hours of trying to strip insulation into the correct lengths and bending diode legs just right and trying to solder with one hand while you hold things down with the other.
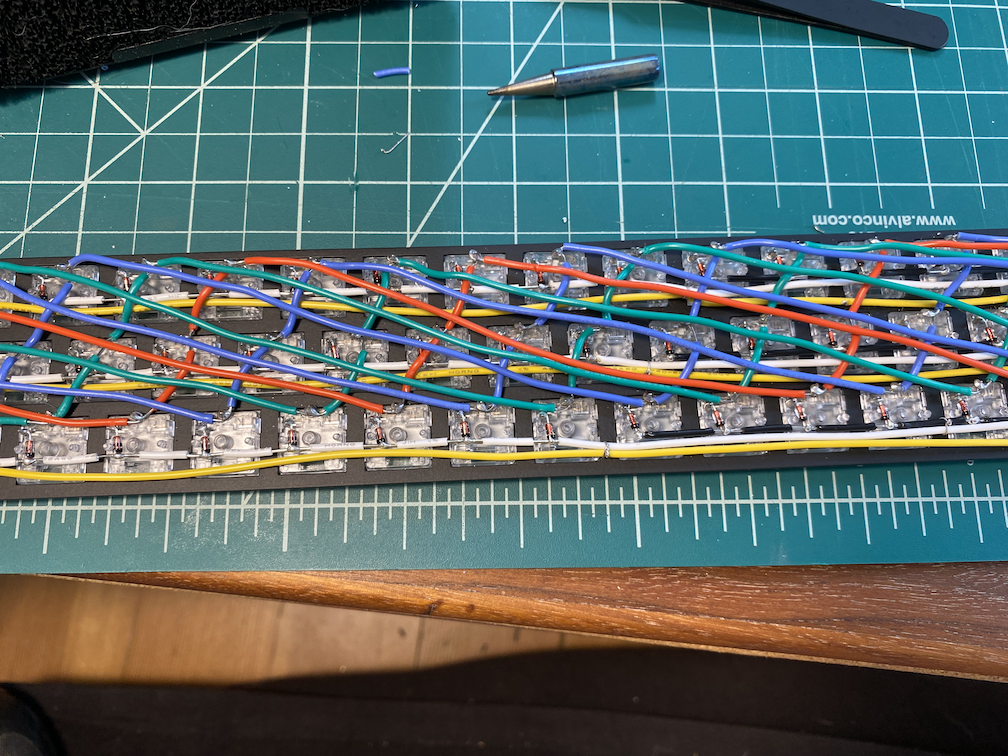
And once I was done – it barely worked!
In the course of soldering this thing together, I had melted some of the insulation, causing invisible shorts where wires fused together through their insulation. It took me a long time to find all of these shorts and fix them: some of the shorts only manifested when the board was in tension inside the case. There was one short that didn’t rear its head until a few days after I thought I had fixed everything! Extremely annoying.
If I were to make another version of this thing, I would absolutely spend the time to learn how to make a PCB. Soldering switches into a PCB is so much easier than soldering wire. Heck, nowadays I think you can order PCBs with hotswap sockets built right into them, and you can skip soldering altogether.
Enclosure
The case enclosing the instrument is as simple as possible: two pieces of wood glued to a third piece of wood.
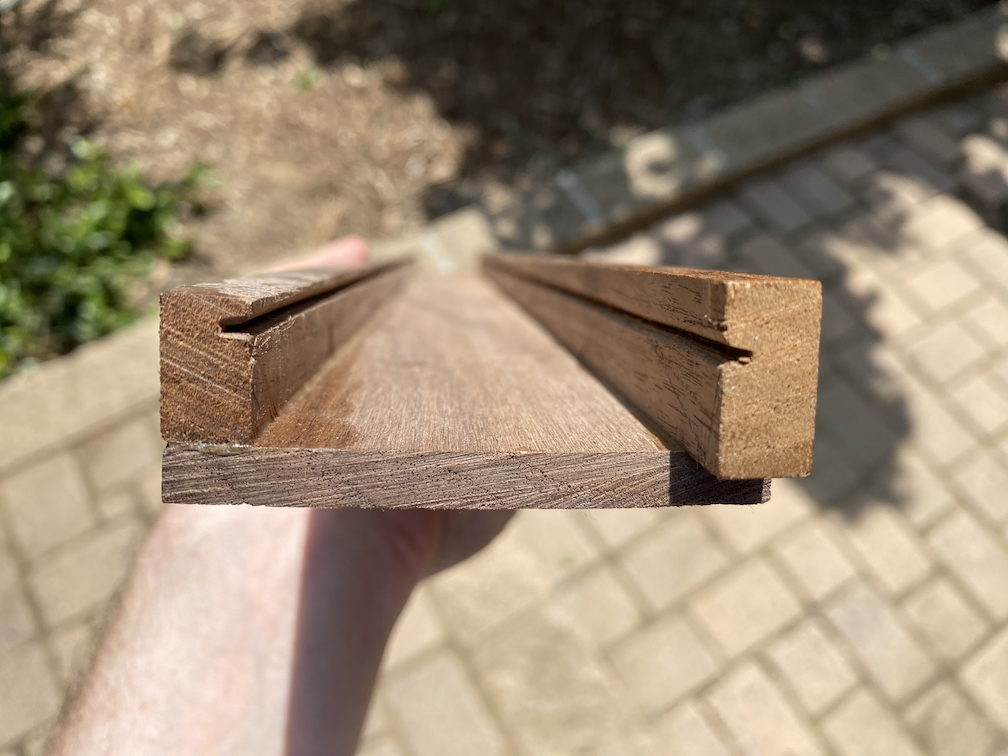
This is the sort of thing that you could make with a table saw in, like, a few seconds. But I don’t have a table saw, and it took me a couple hours to cut the grooves by hand. I don’t really have any tools appropriate for cutting a thin slot like this, but I managed to hack something together with a saw blade kerf and a router plane… it was messy, though. I didn’t cut it deep enough, but I didn’t find that out until after the glue-up assembly, when it was much harder to deepen the cuts.
I rounded the corners so it feels a little bit like a guitar neck, but I kinda wish that it were a little more rounded and more guitar-neck-like. Maybe the next version.
The plate is held in those slots by nothing but tension.
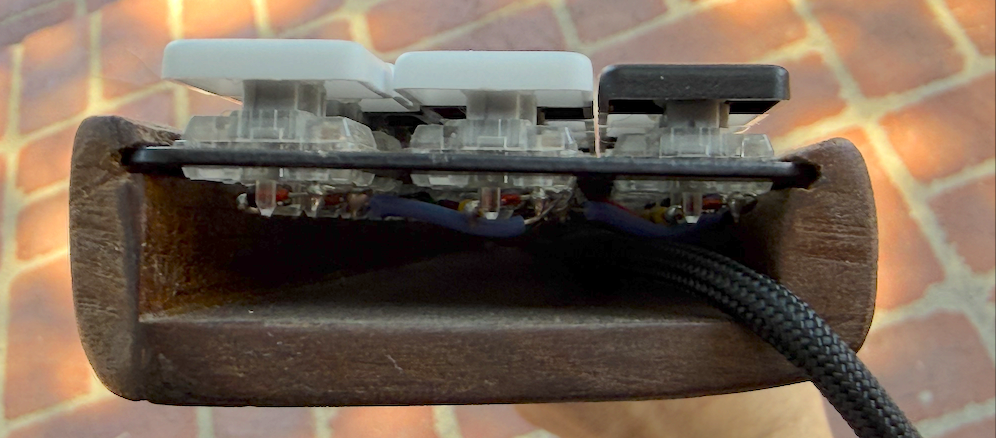
The finish is pretty rough, but from a distance it can pass for a “real” instrument.
Keycaps
I decided to use Choc switches to keep the instrument as thin as I could, but I think this was just a mistake. It severely limited my keycap options, and the best thing I could find were MBK Convex POM keycaps.
I couldn’t find anywhere selling these in bulk; it seems like they’re meant to be only used for modifier keys on a keyboard that otherwise uses the regular concave MBK profile. But I could get them in both black and white, and I thought they would feel better than traditional concave keycaps, so I forked up $60 just for the caps.
But it was actually easier to play this thing with no keycaps at all! You have a lot more room to maneuver the fingers on your left hand without them. With the keycaps on, it’s kinda hard to play complicated chords – you have to angle each of your fingers enough that they don’t touch any adjacent keys, which is hard to do when you’re stretching across the fingerboard. It’s also easier to use your thumb on the right hand – with spaces between the buttons, you can press keys on any row without hitting the row beneath it.
I think the instrument would be much more playable with smaller, circular keycaps with gaps between them – or maybe something like this would work well. Basically, chromatic button accordions already figured this out. The round buttons aren’t just for simplicity; they’re much easier to play than square buttons. They give your fingers room to breathe. I didn’t expect this to make such a difference going in, and all in I think this is the single worst thing about this prototype.
Keybed
There’s another ergonomic flaw that accordions already figured out: it’s hard to press keys with your thumbs. It’s fine for your right thumb to press keys on the bottom row, but it’s really hard to press a key in the middle row without also pressing a key on the bottom row. You have to lift your whole hand up to put a steep angle on the thumb and it just feels terrible.
So the traditional solution is: give the rows slightly different “elevations.” Make the middle row slightly taller than the row below it, so that when the thumb presses a key on that row, it has some clearance over the row beneath it. It’s a great idea and kind of obvious once you hold one of these in your hands, but not something I thought about before construction.
But this particular instrument has to solve a problem that the accordion doesn’t: because you have both the left and right thumbs to think about, it’s not obvious how to account for that. If you match an accordion, uniformly stepping upwards as they get further from the right hand, then they’re exactly the opposite of what you want on the left.
My current idea to try to solve this is to make a five row keyboard, but to have the center row be the tallest, and then get lower as you get further away from it. This would mean that each thumb can only reach three of the five rows – but that’s sufficient to find every root note on each thumb. Would this scheme make it too hard to press rows with the other fingers, though? I don’t know. It seems like it should be alright, but I haven’t tried it yet.
Another decent option is to ignore the left thumb entirely, and lean into the “guitar” form factor. But I find myself usually holding it more like a cello – that angle of attack is easier on my left hand, and it makes the left thumb technically usable. And I worry that an entirely “upward sloped” keybed might make the regular fingers on the left hand work too hard. So I dunno.
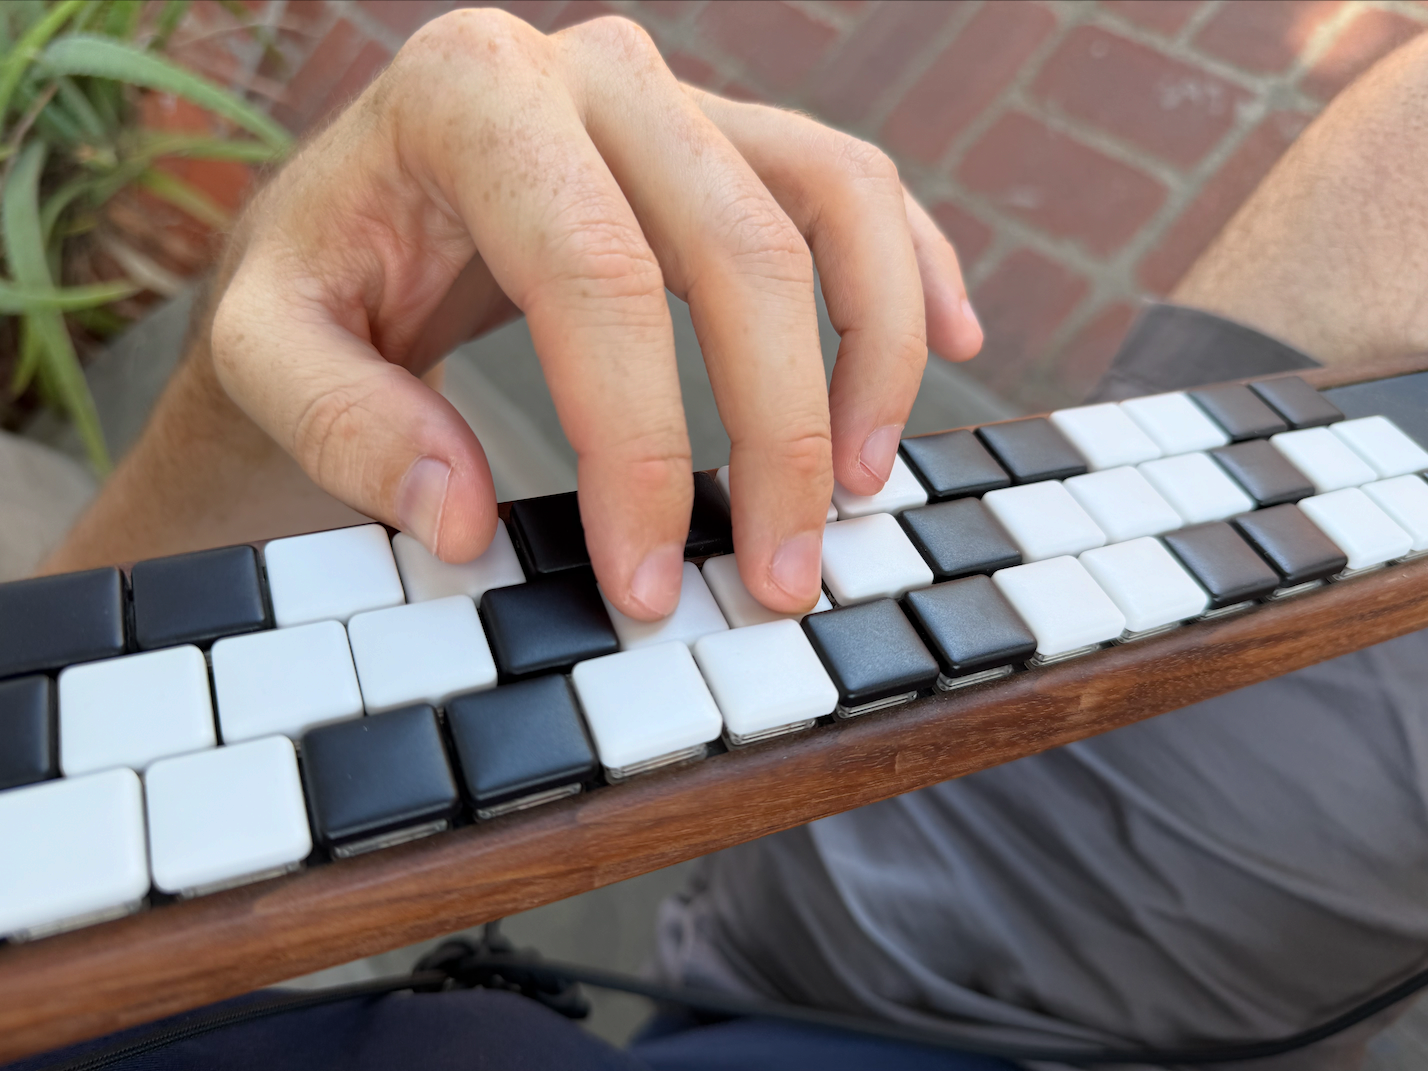
Maybe ideal is to slope up to the third row, and then to have the third, fourth, and fifth rows flat. It means no help for the left thumb, but the right thumb can reach every root note without losing anything for the rest of the right hand fingers. Maybe?
I think with round keycaps this matters a lot less, though.
Firmware
The brain of this thing is an Adafruit Feather 32u4 Basic Proto, which had enough GPIO pins and was in stock when I wanted to buy it. The code is pretty simple – reading a key matrix is just a nested for loop, and it’s just a MIDI instrument. That means it doesn’t actually know how to make any sounds by itself – it just sends messages like “play note 82” to a computer that knows how to do actual audio synthesis. The MIDIUSB library made this trivial – I can’t really emphasize enough how easy it is to program microcontrollers in this modern day and age. This was the quickest part of the entire process.
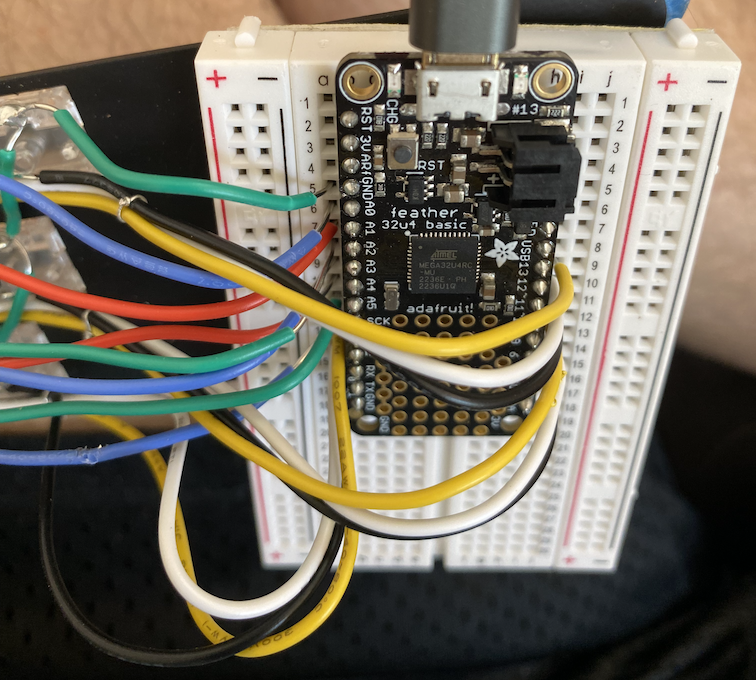
The wires are soldered now, although the microcontroller itself is just floating inside the instrument case, surrounded by a protective layer of electrical tape. It seems to work fine? So far? Another good reason to spring for a PCB.
With that, the instrument is finished. And we can finally find out if this idea was a good idea or not.
several months of regular, disciplined practice later
No, of course not. Here’s me noodling around with it the day after I built it:
It’s fun to play! Although this particular prototype has so much room for improvement that it’s difficult to justify investing much effort into learning how to play it “well.”
I actually built this thing in 2023, and in the intervening years I must admit that I have made zero progress on the instrument. Square keys are too annoying; velocity sensitivity is really quite important for making music that sounds good, and having only three rows to work with means the left hand is constantly contorting.
I still like this idea; I think it has some potential. I’m not sure when I’ll have time to build another prototype, but I think that this instrument with five rows of hall-effect switches and round keycaps would actually be pretty great. It would still be small and portable, especially compared to a piano or an accordion. You don’t need a stand or a surface for it, and you can play it standing up. I like the asymmetry of the left and right hands, and as a guitar player owner the form factor feels good to me.
One day I will make time for another prototype. But maybe someone else will beat me to it?
-
Do you know better? Please tell me! I always love adding new instruments to my isódex. ↩︎
-
The Dualo Du-Touch might be an exception, but since each hand is only half of a chromatic scale, it’s hard to compare them. ↩︎
-
This was true when I originally wrote this, in 2023. It’s much less true today: Hall effect switches are widely available, and they make this much simpler. But they still require manufacturing a custom PCB with analog multiplexers and also knowing how to design a custom PCB with analog multiplexers. Here is an excellent thread about doing this that I wish existed back when I built this keyboard. ↩︎