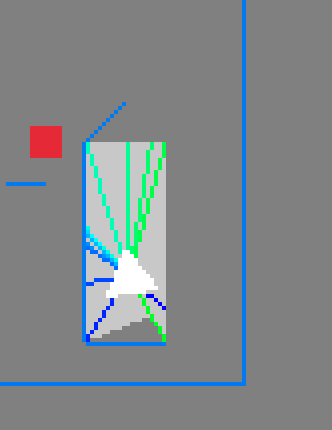
Okay, so we just spent two posts talking about weird macro trivia. We’ve completely lost sight of why we were writing a test framework in the first place, so let’s review the bug we’re trying to fix:

This isn’t a particularly difficult or complicated or scary bug. You can actually see what the problem is just by looking at that image: the rays are not sorted properly. That green one in the bottom right is out of order, and that’s messing up the triangle fan.
So you can sort of guess where I’m going with all of this – you know I’m going to end up writing a test case for the “sort the points around the origin” function. Something like this:
(test "triangle fan points are sorted in the right order"
  (def points [[14.2 103.2] [123.442 132.44] ...])
  (expect (sort-points points) [[48.1232 302.1] [48.132 444.23] ...]))
Which is a much better way demonstrate the problem, because it’s a unit test. And it’s extremely important to write unit tests, because otherwise we won’t have good test coverage – and if we don’t have good test coverage, we won’t be adhering to test-driven development. So even though it might be a little bit difficult to read that test, and even though it might be harder to convince ourself that the fix is correct than it would be by just playing the game, it’s best practice to do it this way.
Haha no I am obviously kidding.
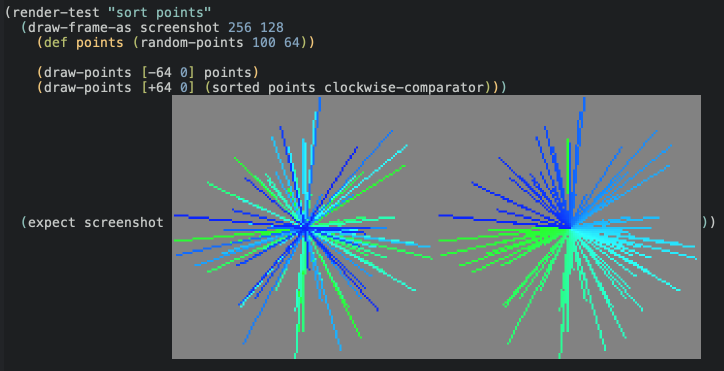
That test is garbage. We’re not going to write that. We’re going to write this:

what kind of witchcraft
Okay, look, I know I said before that there was nothing Emacs-specific about Judge, and you could use it from any editor and everything would work just fine. That was completely true. I didn’t lie to you.
What you’re actually looking at is a file that looks like this:
(render-test "sort points"
  (draw-frame-as screenshot 256 128
    (def ray-results (me/cast-rays [0 0] walls))
    (def points (random-points 100 64))

    (draw-points [-64 0] points)
    (draw-points [+64 0] (sorted points clockwise-comparator)))
  (expect screenshot screenshots/c46a045af4a02a4ec19cb78034216be4.png))
But by sprinkling a little bit of Emacs fairydust on it, we can coax Emacs to show us an inline preview of that image.
Which isn’t necessary, but it is really nice! We don’t have to sacrifice any of the ergonomics of the self-modifying test; we don’t have to degrade to writing normal, boring, out-of-band snapshot tests, just because we feel that the best way to express this test is with an image.
So all we have to do is capture the current graphics context as a texture, save that texture to a temp file, hash its contents, and then move it into a little screenshots directory with a name that matches its contents. Nothing magic, nothing crazy.
But at the same time…
It’s a little bit magical, isn’t it?
are you going to wax poetic about–
There are plenty of ways to convince yourself that your code works. You can run it. You can play with it in a REPL. You can add debug print statements. You can “manually verify” that it works however you’d like.
But when you write down your evidence – in the form of a test – you gain a cool superpower. You gain the power to share that evidence. To re-create your argument at different points in time and space. So that if you are ever in doubt – does that still work? Did I break it, with my latest changes? – you can go through the exact same steps you took before, and convince yourself all over again.
But in order for that to work, your test has to be convincing.
I feel like discussions about tests are so often concerned with preventing “regressions.” Trying to prevent bugs in the future. Which is obviously very valuable – but tests can be so much more than that. Tests can be documentation; tests can be arguments that your code behaves – or does not behave – in certain ways.
And I think that the image above is a very nice argument. It’s easy to look at that and spot the bug; it convinces us that we have a problem at a single glance. And once we tweak our code, we will be able to easily observe the effect our changes have.
It is not a good regression test. It only tests this one example, with a carefully chosen random seed to tickle the bug. Once we change our code, we won’t know if we actually fixed it, or if it just went into hiding.
If my livelihood were in some way tied to the correctness of this function, I would choose to write a property test comparing my implementation against the trivial atan-based comparator instead. But that’s not why I wrote this test. I wrote this test because it’s going to make it easier for me fix this bug. I wrote this test so that I can observe the behavior of my code more easily.
i think i fell asleep there for a minute
Okay yeah that’s all I’ll say about the Nature of Testing. You get it. Thank you for indulging me.
So the real reason I wrote Judge was that I wanted to write tests with pictures in them. I thought it would make for very readable tests; I thought I would be able to convince myself that all the weird vector stuff I was doing actually worked; I thought it would be a useful tool to help me understand my code better.
And it was! It was extremely useful, actually – but I don’t want to spoil anything. Suffice it to say: we’ll be coming back to this technique in a future blog post.
So it was very important to me that Judge be able to support this workflow. So what did that take?
Not much!
Actually, to a first approximation, nothing. As soon as I had the (test) and (expect) macros working, I was able to write tests exactly like this. With one little problem: they were slow.
I’m talking triple digit milliseconds slow. Unacceptably, implausibly slow. Perceivable to the human eye slow.
The problem was that I was creating the OpenGL graphics context in every test. Initializing Raylib in every test. So every test had to spend, like, 150ms setting this up and tearing it down. That would have been awful, and I wouldn’t bother writing any tests with pictures in them, and I would have been sad.
So I had to do a little bit of work in Judge to support this workflow more easily.
Which brings us to our final macro. You’ve already seen test and expect – so now let’s talk about deftest.
deftest lets you define a new “kind” of test. Here’s an example:
(deftest render-test
  :setup (fn []
    (jaylib/set-trace-log-level :warning)
    (jaylib/set-config-flags :window-hidden)
    (jaylib/init-window 1 1 "render-test"))
  :reset (fn [_] nil)
  :teardown (fn [_] (jaylib/close-window)))
deftest is a macro that defines another macro. Which might sound like advanced macro nonsense, but it’s actually not that bad. Yes, there are nested quasiquotes, but they’re actually not hard to reason about once you’ve written them once. It was a nice, mind-expanding exercise.
Honestly, I don’t have anything interesting to say about the implementation. After everything else we’ve been through with macros, it was pretty straightforward.
So: how does it work?
Well, you’ve actually already seen it, though you might not have noticed. But take another look at this test:
(render-test "sort points"
  (draw-frame-as screenshot 256 128
    (def ray-results (me/cast-rays [0 0] walls))
    (def points (random-points 100 64))

    (draw-points [-64 0] points)
    (draw-points [+64 0] (sorted points clockwise-comparator)))
  (expect screenshot screenshots/c46a045af4a02a4ec19cb78034216be4.png))
render-test is basically the same as test, except that you know all render-tests will be invoked with the OpenGL context already initialized, so you only pay the startup tax once.
It behaves exactly the way you’d expect: the test runner calls your setup function the first time it encounters a render-test. And then it runs some teardown code after all render-tests have completed.
You also have the option to “reset” your context before each individual test – although that is not necessary in this case. But if you wanted to go one step further and, like, share the same texture between every test, then you’d be able to blank it out in reset. But I didn’t need to do that.
Because the tests themselves are fast. Even though they’re allocating textures, drawing lines, encoding PNGs, hashing files – that all happens pretty much instantenously. Sub-millisecond, at least; I didn’t bother to measure at a higher resolution than that. Fast enough that I can write as many tests as I feel like without having to worry about optimizing them for a long time. Thanks, computers.
So that’s deftest. I tried to make it generic enough that it might be useful in other situations, but the only real use case I had in mind was this particular Raylib startup issue.
So let’s talk a little bit more about that.
snapshot testing
There’s an annoying concrete issue with this kind of “snapshot test:” images are big.
PNG files are a lot larger than source code. And it would be really annoying if we had to download multiple megabytes of images every time we clone the repo or whatever. pngcrush does help a lot, but the best way to keep file size down is to render low resolution images.
But there’s a tradeoff that we don’t want to make: low resolution images are also harder to look at. They’re small! I don’t want to squint at my tests. So while I’m fine rendering low-resolution images, I want to scale them up when I actually view them.
No problem, right? Emacs can do that.

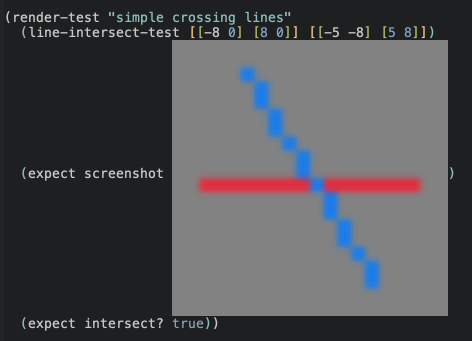
Oh gosh oh gosh oh no. That’s terrible. That simply will not do.
So that’s a 20x20 image, and it’s only 97 bytes – smaller than the UTF-8 encoding of this sentence. But when I scale it up so that I can actually see it, it gets incredibly blurry, because when Emacs scales images, it uses a bilinear image filter. Great for photographs; terrible for pixel art.
And sadly Emacs – for all its talk about customization, for all the show it puts on about the user’s ability to configure it – offers no way to change this behavior. There is no way to set a different interpolation function.
So we have to choose: do we render high-resolution images and bloat our repo, slowly accumulating some difficult-to-quantify debt that our future selves will one day have to deal with? Or do we accept the blurriness, squint at our tests, and move on with our lives?
No; of course we’re going to patch Emacs to fix this. But we can save that for the next post.